


If you are reading this article, I hope you are already familiar with the Spring framework. If not, I would recommend going through the Spring Boot Documentation to get a little bit of an idea about the Spring Boot framework.
Let's Get Started 😄
First, let's set up our basic Spring Boot project before diving deep. Initialize our pom.xml with the required dependencies. For that, you can go to Spring Initializer and select the required packages. Alternatively, you can create a default project and use my pom.xml file to add the dependencies.
Here is my pom.xml file:
<?xml version="1.0" encoding="UTF-8"?>
<project xmlns="http://maven.apache.org/POM/4.0.0" xmlns:xsi="http://www.w3.org/2001/XMLSchema-instance"
    xsi:schemaLocation="http://maven.apache.org/POM/4.0.0 https://maven.apache.org/xsd/maven-4.0.0.xsd">
    <modelVersion>4.0.0</modelVersion>
    <parent>
        <groupId>org.springframework.boot</groupId>
        <artifactId>spring-boot-starter-parent</artifactId>
        <version>2.5.5</version>
        <relativePath/> <!-- lookup parent from repository -->
    </parent>

    <groupId>com.example</groupId>
    <artifactId>demo</artifactId>
    <version>0.0.1-SNAPSHOT</version>
    <name>demo</name>
    <description>Demo project for Spring Boot</description>
    <properties>
        <java.version>11</java.version>
    </properties>
    <dependencies>
        <dependency>
            <groupId>org.springframework.boot</groupId>
            <artifactId>spring-boot-starter-data-jpa</artifactId>
        </dependency>
        <dependency>
            <groupId>org.springframework.boot</groupId>
            <artifactId>spring-boot-starter-mail</artifactId>
        </dependency>
        <dependency>
            <groupId>org.springframework.boot</groupId>
            <artifactId>spring-boot-starter-security</artifactId>
        </dependency>
        <dependency>
            <groupId>org.springframework.boot</groupId>
            <artifactId>spring-boot-starter-web</artifactId>
        </dependency>

        <dependency>
            <groupId>org.postgresql</groupId>
            <artifactId>postgresql</artifactId>
            <scope>runtime</scope>
        </dependency>
        <dependency>
            <groupId>org.projectlombok</groupId>
            <artifactId>lombok</artifactId>
            <optional>true</optional>
        </dependency>
        <dependency>
            <groupId>io.jsonwebtoken</groupId>
            <artifactId>jjwt</artifactId>
            <version>0.9.1</version>
        </dependency>
        <dependency>
            <groupId>org.springframework.boot</groupId>
            <artifactId>spring-boot-starter-test</artifactId>
            <scope>test</scope>
        </dependency>
        <dependency>
            <groupId>org.springframework.security</groupId>
            <artifactId>spring-security-test</artifactId>
            <scope>test</scope>
        </dependency>
    </dependencies>

    <build>
        <plugins>
            <plugin>
                <groupId>org.springframework.boot</groupId>
                <artifactId>spring-boot-maven-plugin</artifactId>
                <configuration>
                    <excludes>
                        <exclude>
                            <groupId>org.projectlombok</groupId>
                            <artifactId>lombok</artifactId>
                        </exclude>
                    </excludes>
                </configuration>
            </plugin>
        </plugins>
    </build>

</project>
We are using the spring-boot-starter-security package to handle authentications and the jjwt package for encoding and decoding JWT tokens.
I have already set up my local PostgreSQL database. You have to update your application.yml file with your local username and password. You can find my configuration here.
If you start your Spring Boot application, it should successfully connect to your local PostgreSQL database.
Schema Design
Before moving forward, let's design how our schema will looks like. In our User schema, we should at least have these fields: username, password (hashed), user role, and enabled.
For the password, we will take the help of BCryptPasswordEncoder of Spring Security to convert the plain text password to a hashed password (pass1) and store it in the database. During login, we will convert the user input password to a hashed password (pass2) and match if pass1 and pass2 are the same or not. If yes, we will let the user login to our service.
Here is the User Schema
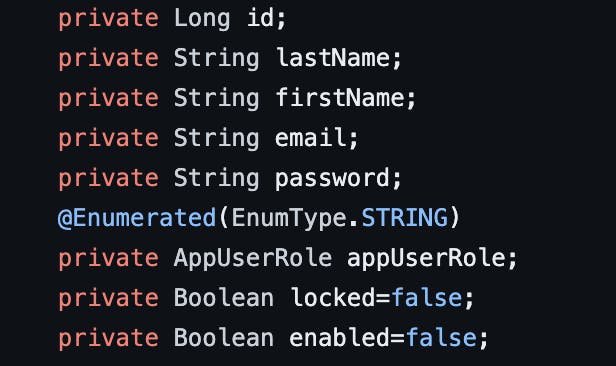
You can take help of the @Data annotation from Lombok to set getter and setter methods, which will reduce boilerplate code. In the user role, we have two options: admin and user.
The enabled flag will help us detect if the user has confirmed the link sent to their email during registration. When the user has only signed up with a username and password, we keep the enabled flag as false. The user will not be allowed to login until and unless it is true. To enable it, we have to generate a random token specific to that user and send it via email. When the user confirms that link within a specific time, we set enabled = true, and then the user can login with the username and password. We also have to keep track of the Token, so let's decide the schema for that as well.
In the Token schema, we will keep token, createdAt, expiredAt, and confirmedAt. token will store the token value, createdAt will store when the token was created, expireAt stores when it will expire, and confirmedAt is when the user confirmed via email. If only confirmAt value is lower than expireAt value, we will go ahead and set the enabled flag as true.
You also have to set up your local mail server and add the configuration to application.yml file.
Quick Recap 📖
Let's look at what we have built till now. Assuming UserA comes and hits signup, we will take their username, password, and store it in the database with the default value of enabled as false. They can't login as the enabled flag is false. We will send an email with a generated token attached to it. We will save the token and other details like expiry date, createdAt, and confirmedAt. Once the user verifies, we will update token details in the database and also set enabled = true. The user can now login and get a JWT token generated from their user ID. They can save the token in local storage or somewhere else for further use.
You should have built at least this much till now:
User Schema
Token Schema
Controller for Login, Signup, verify_token
If you are stuck somewhere please take help from here.
Securing Internal API
Currently, we are at the login stage, so users can login and receive a JWT token. This token will be used for verification of internal API calls. We will add a filter that will fetch the Bearer token and decode it with the given pass key. If the username is decoded successfully, we will let users consume the API; otherwise, we will throw an unauthorized response.
@Override
    protected void doFilterInternal(HttpServletRequest httpServletRequest, HttpServletResponse httpServletResponse, FilterChain filterChain) throws ServletException, IOException {

        String authorizationHeader = httpServletRequest.getHeader("Authorization");

        String token = null;
        String userName = null;

        try {
            if (authorizationHeader != null && authorizationHeader.startsWith("Bearer ")) {
                token = authorizationHeader.substring(7);
                userName = jwtUtil.extractUsername(token);
            }

            if (userName != null && SecurityContextHolder.getContext().getAuthentication() == null) {

                UserDetails userDetails = service.loadUserByUsername(userName);

                if (jwtUtil.validateToken(token, userDetails)) {

                    UsernamePasswordAuthenticationToken usernamePasswordAuthenticationToken =
                            new UsernamePasswordAuthenticationToken(userDetails, null, userDetails.getAuthorities());
                    usernamePasswordAuthenticationToken
                            .setDetails(new WebAuthenticationDetailsSource().buildDetails(httpServletRequest));
                    SecurityContextHolder.getContext().setAuthentication(usernamePasswordAuthenticationToken);
                }
            }
            filterChain.doFilter(httpServletRequest, httpServletResponse);
        }
        catch(Exception e){
            System.out.println(e);
            filterChain.doFilter(httpServletRequest, httpServletResponse);
        }
    }
We can add this filter during overriding the configure method in Spring Security.
Architecture Diagram 🌁
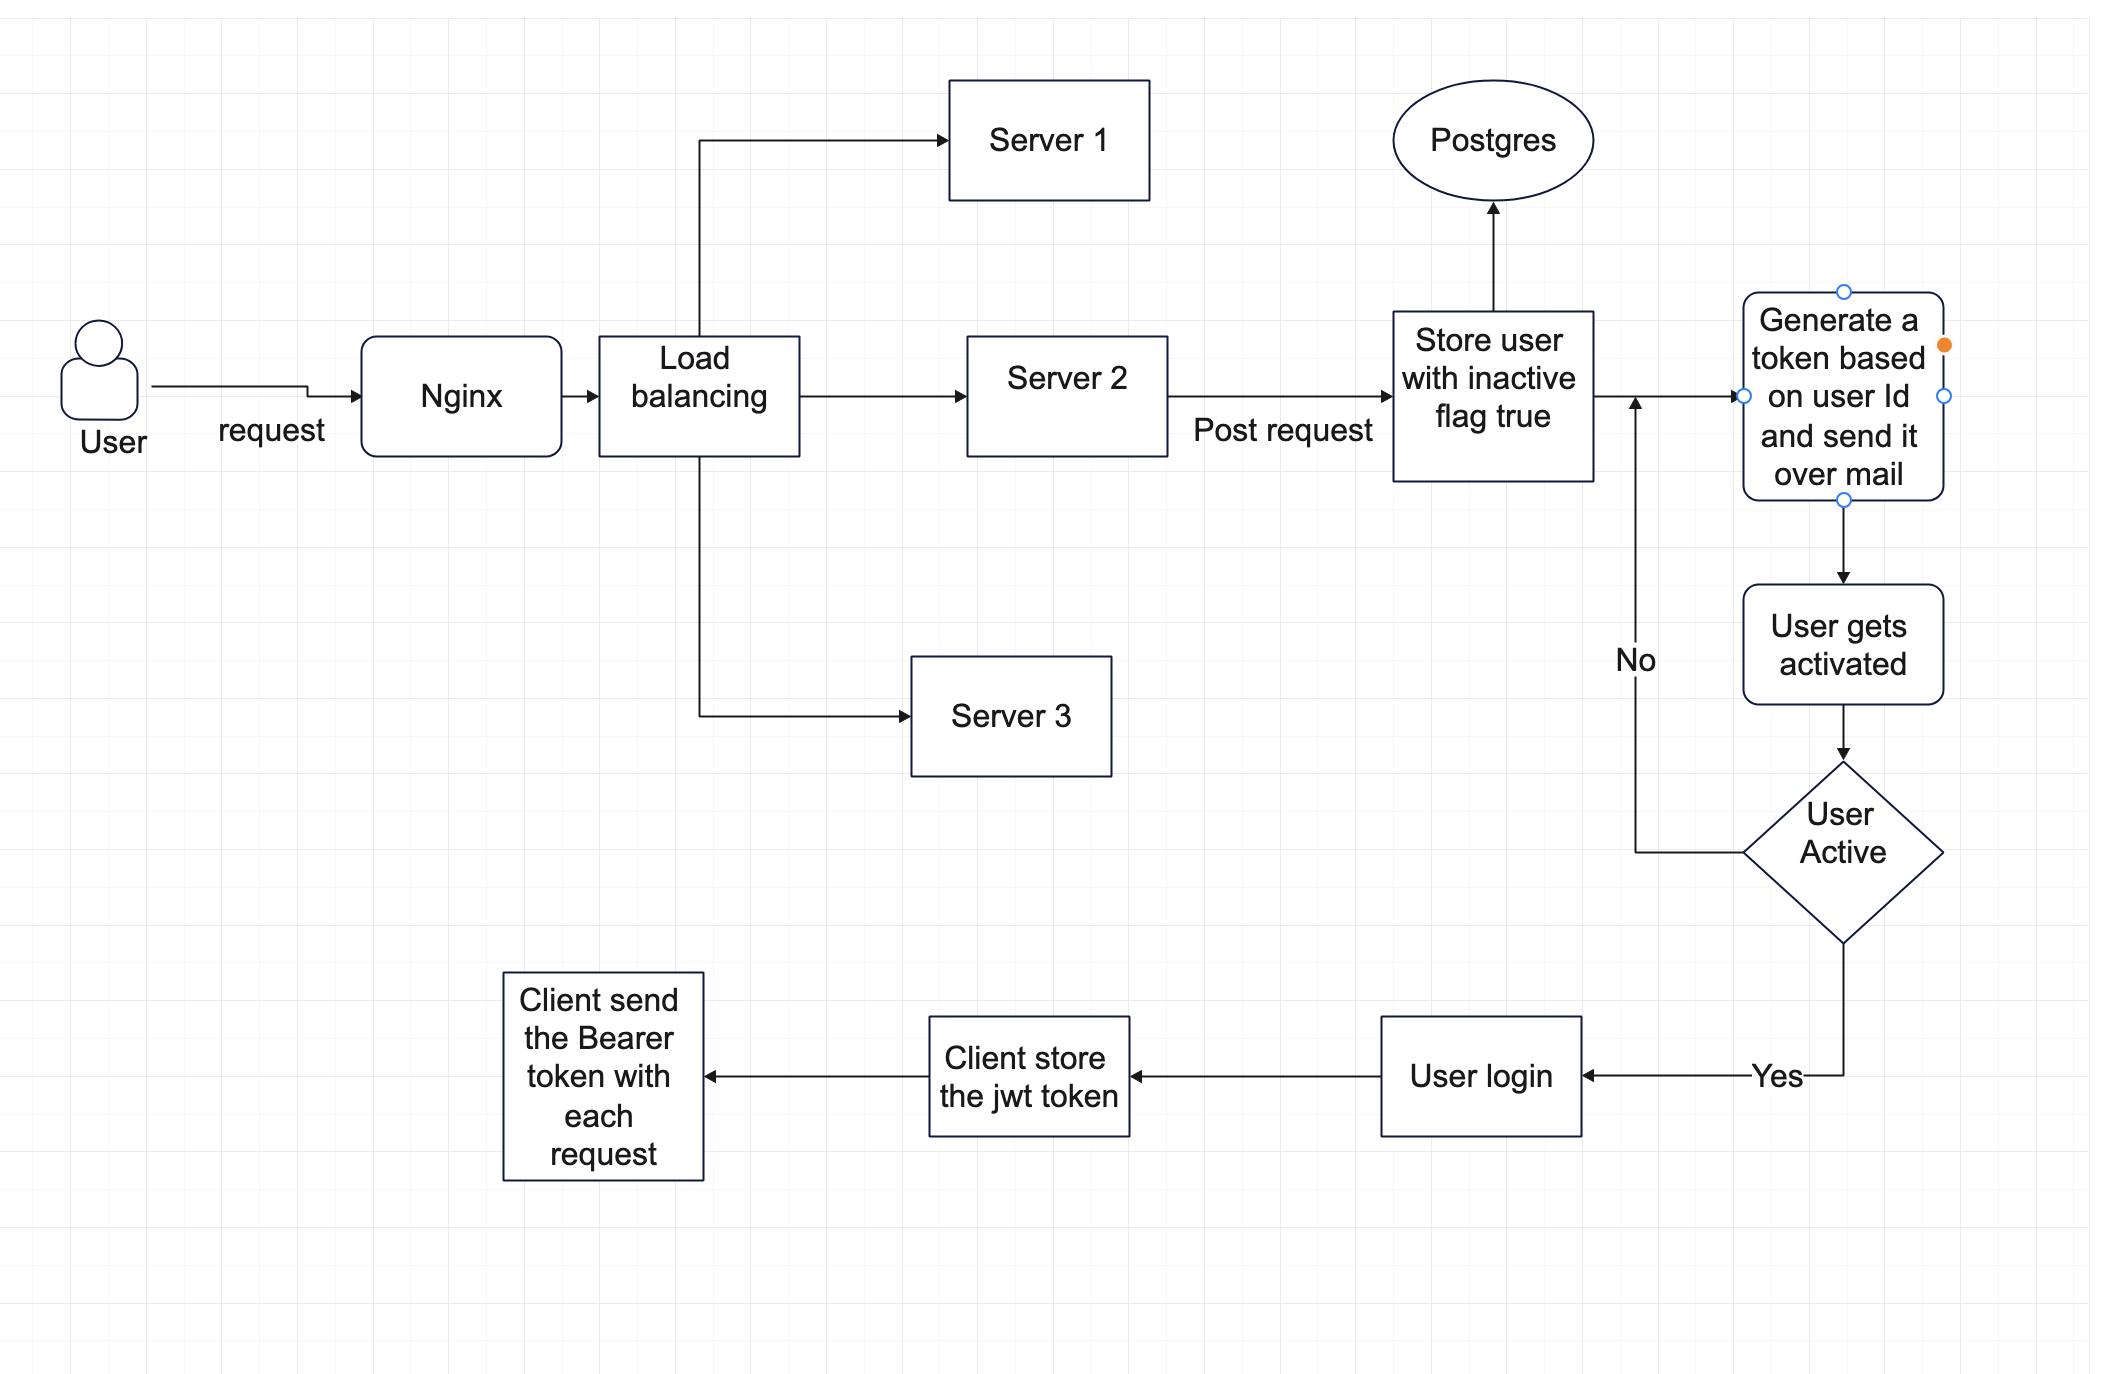
Here I added the diagram for the whole application. You can take a reference from it.
Let's Now Dockerize Everything 🤩
We will first create the Dockerfile where we will store the docker configuration.
FROM openjdk:11

WORKDIR /app

COPY ./target/demo-0.0.1-SNAPSHOT.jar /app

EXPOSE 8000

CMD ["java", "-jar", "demo-0.0.1-SNAPSHOT.jar"]
Here its saying we should fetch openjdk version 11. Then we will set /app as workdir and copy the build file to /app directory. To generate the build file you can mvn package command which will generate the jar file in target folder. Then expose the 8000 port and run the jar application.
Now lets create the docker-compose.yml file which will handle our server docker, postgres db and nginx server.
version: '2'

services:
  app:
#    container_name: 'authentication'
    image: 'authentication'
    build: ./
    depends_on:
      - db
    ports:
      - '8080'
    environment:
      - SPRING_DATASOURCE_URL=jdbc:postgresql://db:5432/registration
      - SPRING_DATASOURCE_USERNAME=postgres
      - SPRING_DATASOURCE_PASSWORD=postgres

  db:
    image: 'postgres'
    ports:
      - '5432:5432'
    environment:
      - POSTGRES_USER=postgres
      - POSTGRES_PASSWORD=postgres
      - POSTGRES_DB=registration

  nginx:
    image: nginx:latest
    volumes:
      - ./nginx.conf:/etc/nginx/nginx.conf:ro
    depends_on:
      - app
    ports:
      - "5000:5000"
There are 3 different services app, db and nginx. Setup the configuration and environment variables and also the port forwarding according to you.
Now build everything with docker-compose build and run the application with docker-compose up
Now your server will be running on port 5000 successfully 🥳.
Conclusion
Here I hope you have a rough idea of how security works in spring boot application. You can try building and playing around with it. Here is the Github code for your reference. If you enjoyed this article you can support me by buying me a coffee and following me on twitter.